Parameter Editor
One screen per parameter that shows every scene that changes it and every knob, pedal, and MIDI control that drives it, with per-control ranges and curves.
The Parameter Editor is the one place to see everything that can move a single parameter. Open it on the amp’s Gain, for example, and you can see which scenes change the gain, which knob, pedal, or MIDI control is wired to it, and how far each one sweeps it.
Opening the Parameter Editor
Tap any parameter to open its editor:
- A knob on a device screen. Tap the knob itself rather than dragging it.
- A dock slot while a device is open. Tap an assigned slot on the parameter dock.
- A target on a Rig Control, pedal, or MIDI screen. Tap the parameter’s name in the list of what that control drives.
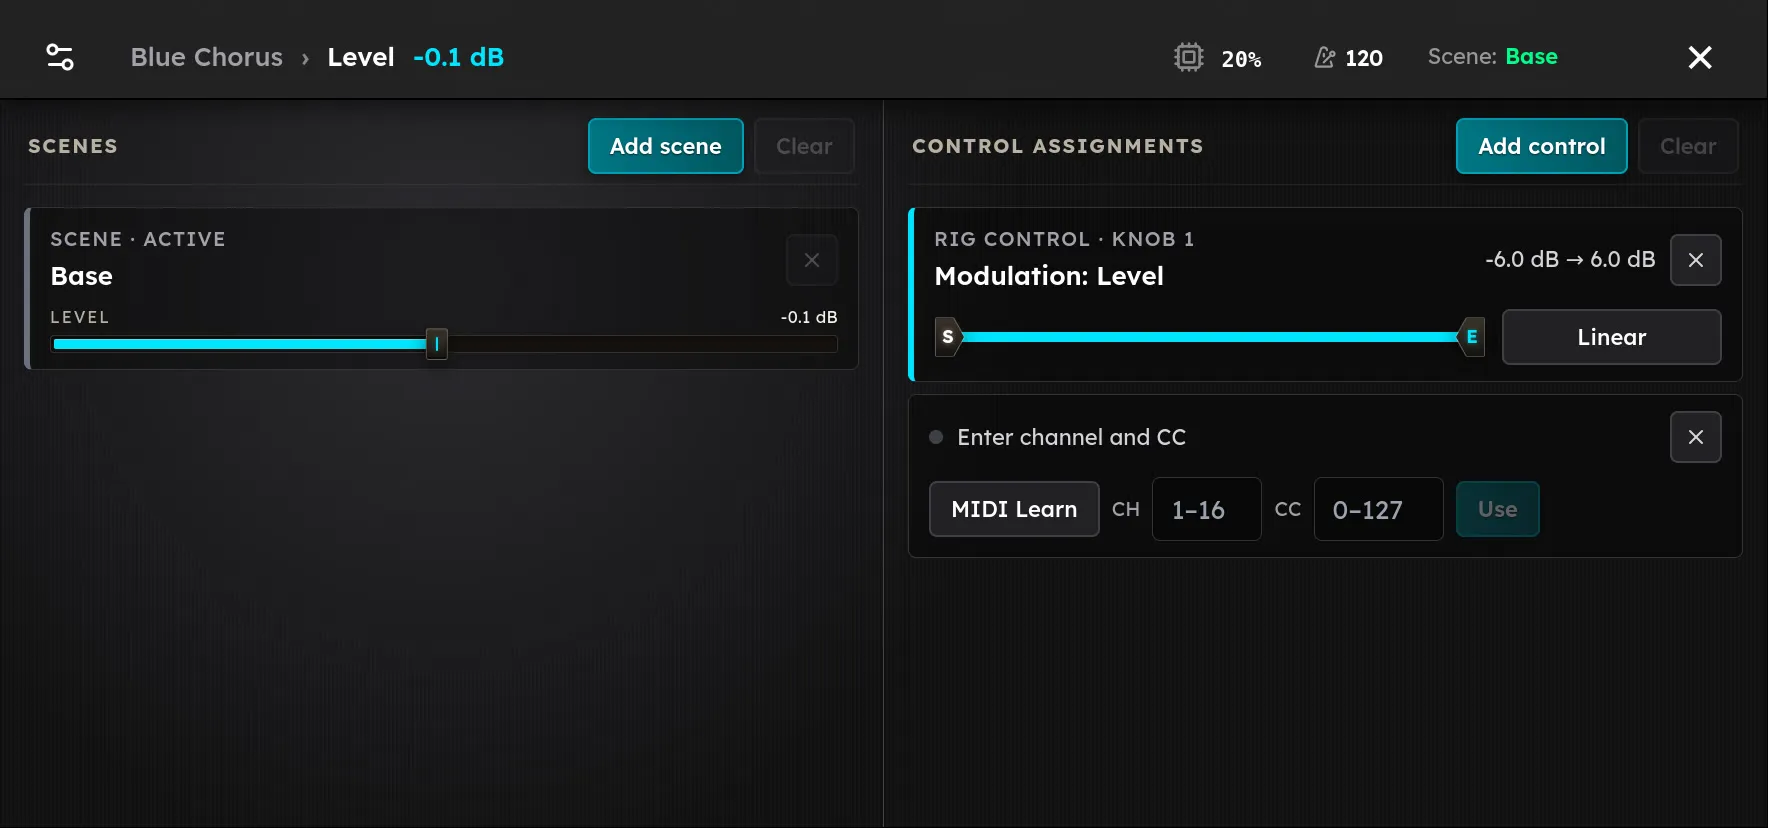
The top bar shows the device, the parameter, and its current value, for example Blue Chorus › Level -0.1 dB. Tap the × to close the editor and return to the screen you came from, even if you hopped between several parameters and controls on the way.
Small dots under a knob tell you there is something to see before you open it. A dot in the accent colour means a control drives the parameter. A light grey dot means at least one scene stores its own value for it.
The Scenes column
The left column lists every scene that stores a value for this parameter, in scene order. Each row carries the scene’s name and colour, and the scene you are currently on is marked Active. Base always appears first, because the Base Scene holds the starting value for every parameter.
Each row has a fader for that scene’s value. You don’t need to switch scenes to use it. Drag the fader on “Lead” and you have set the Lead value, while you keep playing whatever scene you are on. Editing the active scene’s row changes the sound immediately, exactly as turning the knob would.
- Add scene opens the scene grid. Pick a scene and it stores the parameter’s current value as its own override. Then fine-tune it with that row’s fader.
- × on a row removes that scene’s override, so the scene goes back to using the Base value. Base cannot be removed.
- Clear removes every scene override for this parameter and leaves only Base.
Scene values are part of the rig. Save the rig to keep them, just as you would after turning a knob.
The System Volume has no Scenes column entries. Scenes store device parameters only.
The Control Assignments column
The right column lists every control that drives this parameter. Each row shows what kind of control it is and which one, for example Rig Control · Knob 1, Expression, or MIDI · CH 1 · CC 11. The row also shows the range the control sweeps, such as -6.0 dB → 6.0 dB.
Adding a control
Tap Add control and choose one of three tiles:
- Rig Control puts the parameter on the next free slot of the rig’s knob dock, so a knob turns it whenever this rig is loaded. See Rig Controls.
- Exp. Pedal lets a pedal on the EXP jack sweep the parameter from heel to toe. A parameter can take only one expression mapping, so the tile reads Already assigned once it has one.
- MIDI adds an Enter channel and CC row for a MIDI control change message. Tap MIDI Learn and move a knob or pedal on your controller to capture its port, channel, and CC. You can also enter the CH and CC by hand and tap Use. A CC that already drives this parameter is refused, so pick another.
Parameters with a number value can be driven by all three. A switch or a selector, such as a mode with a fixed list of choices, can be driven too. The control’s travel is divided into equal slices, one per choice, and the parameter steps through them as you sweep. Only a parameter without a number behind it, such as a loaded model file, cannot be assigned. The Exp. Pedal and MIDI tiles show Not a numeric value for those.
Ranges and curves
Every row has its own range slider and curve button, so the same parameter can respond differently to each control. For example, the pedal can sweep the whole range while a knob covers only the useful middle.
- Range. Drag the S (start) and E (end) handles to set where the sweep starts and ends. Put the start above the end for an inverted sweep, so that pressing the toe down turns the parameter down. Put both handles in the same place to pin the parameter to a fixed value.
- Curve. Tap the curve button to cycle between Linear, Logarithmic, and Exponential. Linear spreads the change evenly across the travel. Logarithmic gives finer control at the bottom and moves faster near the top, which suits volume swells. Exponential is the opposite.
Changes to ranges and curves are stored in the rig straight away. There’s nothing extra to save.
Following a control to its other end
Tap a row’s name to open the control it belongs to. A Rig Control row opens that knob’s Rig Control screen, where you can see anything else the knob drives. A pedal or MIDI row opens its entry in Control Mappings. From there, tapping a parameter brings you back to its editor.
Removing controls
Tap × on a row to disconnect that control from this parameter. Other parameters the control drives are unaffected. Clear disconnects every expression pedal and MIDI control from this parameter at once. Rig Control rows stay put, so remove those with their own ×.