Controls
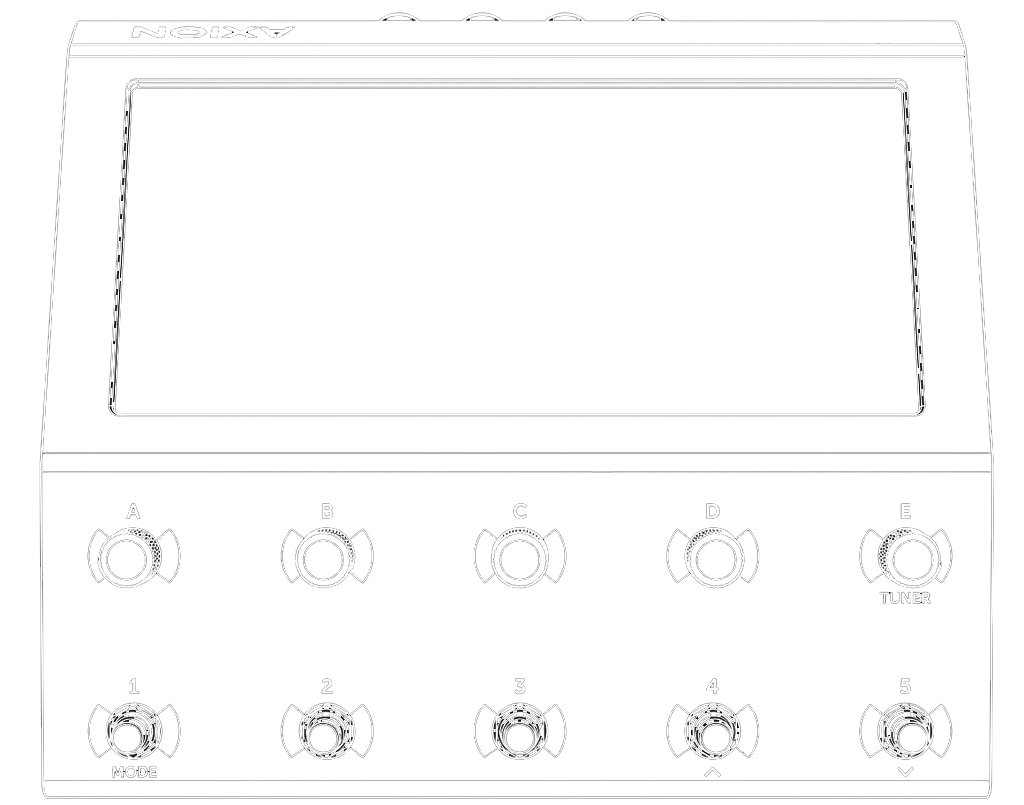
The front panel: touchscreen, the A-E knobs, and the 1-5 footswitches.
Axion has almost no fixed-function controls. Where a traditional amp has a knob permanently labeled “Gain,” Axion has one touchscreen, a row of five knobs, and a row of five footswitches, and what each of them does depends on what’s on the screen and how the current rig is set up.
There are only three things to learn.
The touchscreen
The touchscreen is the main surface. You use it to navigate, build and edit rigs, browse devices and presets, and read meters. Most of what you do on Axion happens here; the knobs and footswitches are the fast, hands-on shortcuts to it.
Knobs (A-E)
Five knobs sit below the screen, silkscreened A through E. Their main job is to adjust whatever parameters the screen shows along its bottom edge. The on-screen label directly above each knob always tells you what that knob controls right now, so the same physical knob might be Gain on one page and Mix on another. Turn a knob, or turn its parameter on screen; they do the same thing.
One knob has a fixed default: knob E sets the master output volume, until the current screen hands it a different parameter. It is the only control that arrives with a job already assigned.
Tap a knob’s on-screen control to open its Rig Control and change what it drives. See Rig Controls for binding knobs, the expression pedal, and MIDI.
Each knob also responds to two more gestures:
- Press triggers an assigned action (see Footswitch Assignment).
- Hold triggers a secondary set of actions. These can be reassigned, the default actions are labeled on the front of Axion such as the tuner, mode change, and previous/next rigs.
Footswitches (1-5)
Five footswitches run along the bottom, labeled 1 through 5, for hands-free control while you play. Like the knobs, each one has a quick press and a press-and-hold:
- Press fires an assigned action. Typically, these can be used for stomps (toggle a device on or off), but a switch can also change scenes, step through rigs, tap tempo, trigger midi, play samples, anything that is built into Axion or that third-party plugins might provide.
- Hold like the knobs, switches can also be assigned secondary “hold” functions. By default they are:
- Hold 1: Switch between view modes
- Hold 4: Preset up
- Hold 5: Preset down
Each footswitch has a light that reflects its state, so you can read the board at a glance: lit when its effect is on, dimmed when bypassed.
Assigning switches
The press and hold actions for every knob (A-E) and footswitch (1-5) are assignable, and the assignments are saved with each rig, so the same physical switch can do different things from one rig to the next. The panel-printed hold functions (Tuner, view mode, and preset up and down) are built-in defaults, but can be overridden and/or moved to other switches.
All switch functionality is managed in the Footswitch Assignment screen, visit this manual page for the full walkthrough.
Expression pedal
An expression pedal connected to the EXP jack gives you continuous, foot-controlled sweep over one or more assigned parameters, such as volume or a wah. You assign it, set its travel range, and shape its response curve in Rig Controls. See Connections for the jack itself.